Understanding Gas Cooktop Installation Basics
Before you start, it’s essential to understand components such as burners, gas lines, valves, grates, and knobs, as they are critical for safe and efficient cooktop function. Familiarising yourself with these elements sets the stage for a successful installation.
Typically, gas cooktop installations require both gas pipe and electrical connections. Understanding the key basics simplifies the setup process.
Understanding the clearance requirements around your gas cooktop, as dictated by local regulations, is also essential. Detecting gas leaks with specialised equipment is a mandatory safety step during setup. While some find DIY installation of your gas stove manageable, If you’re uncertain, our experts are ready to assist with your cooktop installation.
Allowing space your ventilation system requires prevents issues. Reach out to learn more about how to install the gas cooktop project you have envisioned.
Checking Fuel Source Requirements
Please note, when installing a new appliance, verify that your fuel source choice ensures your existing cooktop can operate optimally. Refer to the manufacturer’s manual, as requirements may vary depending on your cooktop design for the gas type and pressure supplied in your home – whether natural gas or LPG.
If you’re replacing existing gas lines and they can’t provide the right fuel source for your gas cooktop, modifications or a new required gas line may be needed, along with the necessary permits. Using the wrong fuel type or pressure is highly dangerous. For gas stove installation, call your local gas company professional to validate your gas shutoff mechanism and review your setup for safe, efficient performance.
For expert advice on ensuring new components meet your kitchen’s fuel requirements, feel free to contact us. Ensuring proper fuel compatibility is essential, whether it’s your initial installation or adapting current fixtures.
Determining Cooktop Dimensions and Countertop Cutout Size
During gas cooktop installation, careful measurement is crucial to ensure the new unit fits the space of your old cooktop. Refer to the manufacturer’s manual to ensure the new cooktop’s dimensions, including width, depth, and cutout size, are suitable. Add an additional 3 mm clearance on all sides to enable precise cutting.
Ensure you also account for pipe joint adjustments and countertop thickness when replacing an old gas cooktop. Cutting boards, sink rims or tiles may affect measurements when you carry out your installation. We recommend creating a cardboard template to accurately measure your gas cooktop dimensions before cutting into your benchtop.
If your new cooktop is larger than the previous one, adjustments to the base cabinets below may be necessary. If renovating, you might consider a new countertop from local home centres. Our skilled team can start your gas cooktop installation, customising it to meet your requirements flawlessly.
Preparing the Installation Space
Remember, it is vital to measure for safety clearances when installing your new gas cooktop. There must be a minimum 600mm vertical clearance between the cooktop burner and all overhead constructs, including your range hood and cabinets. You also need 200mm horizontal clearance from the front edge to surrounding cabinets or walls.
If your existing setup prohibits these clearances, non-combustible materials can ensure safe compliance. Our qualified team can inspect your space and offer recommendations to ensure a safe and compliant upgrade to your kitchen’s cooking area.
Securing the Cooktop
Carefully position your new gas cooktop in the countertop opening as you connect the gas lines to secure it in place. Ensure the edges are perfectly balanced between your cooktop and countertop, maintaining an even clearance on each side. There should be no gaps between the cooktop and benchtop.
To guarantee the endurance of your new amenity, reinforce your installation with brackets, spring clips, or metal tabs around the underside edges to clamp the cooktop in place tightly. Adhesive tape specifically designed for gas cooktop installation can also be used. Tighten until snug and stable.
The cooktop into your benchtop should sit flat, with no rocking, once fully secured. Before operation, confirm it activates correctly and check your valve connections for gas leaks using a soap solution. We’ll complete the installation, assuring no gas leaks, for your stove’s safe setup.
Connecting Gas and Electric
Connecting gas and electric lines is fundamental for safety, especially in electric stove installation. You’ll require a suitable end connector fitting for gas ranges, compatible with your cooktop and gas supply.
Confirm your connector gas hose is an approved variant and that the length of fitting line corresponds adequately for a flexible gas line. Flexible connectors between 4-5 feet long are commonly used. Securely fasten each end, making sure to use a right angle pipe if necessary, aligning the cooktop end to the gas port.
Use Teflon tape or pipejoint compound to seal threaded fittings and prevent leaks.
The electric cable should be routed to reach the power point, avoiding the black gas pipe through an opening near the benchtop’s junction box location at the rear or bottom of the cooktop.
With all valves closed, apply leak detector solution and watch for bubbles, revealing leaks. Address any leaks and turn the gas on only once fully sealed.
Testing for Gas Leaks
It is critical to test for gas leaks after installing your new gas cooktop to prevent fire and explosion risks.
To check there’s no gas leak:
- First, ensure all cooktop valves and the line shutoff valve are turned off.
- In a spray bottle, mix together a 50/50 solution of dish soap and water.
- Once all connections are bubble-free, wipe away the soapy solution with a dry cloth.
It’s crucial every gas connection is sealed fully without leaks before operating a new cooktop. If you cannot fix leaks or if there’s gas escaping, shut off the valve at once and get professional assistance. Safety should be the top priority with any gas appliance installation.
Finalizing the Installation
After securely installing your new gas cooktop, clean up and review all your fittings, ensuring absolute precision before finalising the job. Confirm the cooktop valves, knobs and burner caps are aligned correctly. Lower grates gently into position, ensuring they sit flush without rocking.
Visually inspect the overall installation for a smooth aesthetic finish.
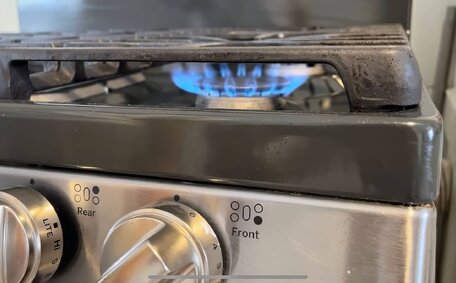
With gas and electric services switched on, perform an operational test.
Ignite the wok burner and other elements at various settings to ensure a consistent flame.
After successful installation, your appliance should exhibit perfect operation, showcasing the attention to detail that’s a part of the comprehensive gas work. Your professional installation now allows the family to enjoy their elegant new gas cooktop for years to come.
Offer the option to schedule a future service call for guidance on using your gas oven efficiently, with contact details for support.
Ensuring Compliance and Certification
When installing gas appliances like cooktops, it’s crucial we adhere to local regulations and standards. Here in Glenhaven, Sydney, all gas fitting work requires compliance with AG 601 under NSW Fair Trading laws and must be undertaken by a fully licensed gas practitioner.
This rule guarantees that only a licensed gas fitter may install or modify any fixed gas appliance, ensuring the use of proper materials and methods. Our specialists at Glenhaven Plumbing hold all the required licensing and insurance to ensure a safe and compliant gas cooktop installation and servicing.
If undertaking a DIY cooktop project, permits and government inspection may still be required before connection to the gas supply network. Feel free to contact us on 1300 349 338 or via email at [email protected] for discussions on your gas cooktop installation or for certified professional assistance.
We’re always happy to handle this paperwork or provide guidance if you get stuck.
Partnering with a reputable local business like ours ensures your family’s safety in accordance with New South Wales compliance standards.